Minimum pitch of a slate roof: how do you know what this is?

Image: Annie Spratt on Unsplash
How to Think About Architectural Knowledge on the Job: Part 2
In Part 1 of this series, I questioned how you know what you know and the reliability of your knowledge.
I want to illustrate these issues with an example. I want to show you how your knowledge becomes embedded in a design and how there can be consequences if you’re working with unreliable information.
I want to encourage you to:
constantly search for critical issues
confirm the right basis for decision-making
be wary of, and try to eliminate assumptions
develop confidence in what you’re doing
I will use a fictitious but realistic case study involving the minimum pitch of a slate roof. The scenario is as follows:
You’re working on some planning drawings that will be submitted in the near future.
The project includes a slate roof over a ground floor extension to a two-storey cottage in the Peak District. It’s simple and conventional. You've seen this kind of thing many times before.
The eaves height has been agreed with the client, as has the width of the extension. The height of the roof is constrained by a first floor window. You know the pitch of the roof is quite shallow but you don’t know whether it’s too shallow.
You ask your colleagues in the office: “does anyone know what the minimum pitch of a slate roof is?”
People want to be helpful and they want to demonstrate that they know the answer. You receive the following responses:
- ‘I wouldn’t go below 25 degrees’
- ‘I always thought it was 22.5 degrees’
- ‘I’ve gone as low as 20 degrees in the past’
- ‘Anything you like as long as you waterproof underneath the slate’
- ‘Depends’
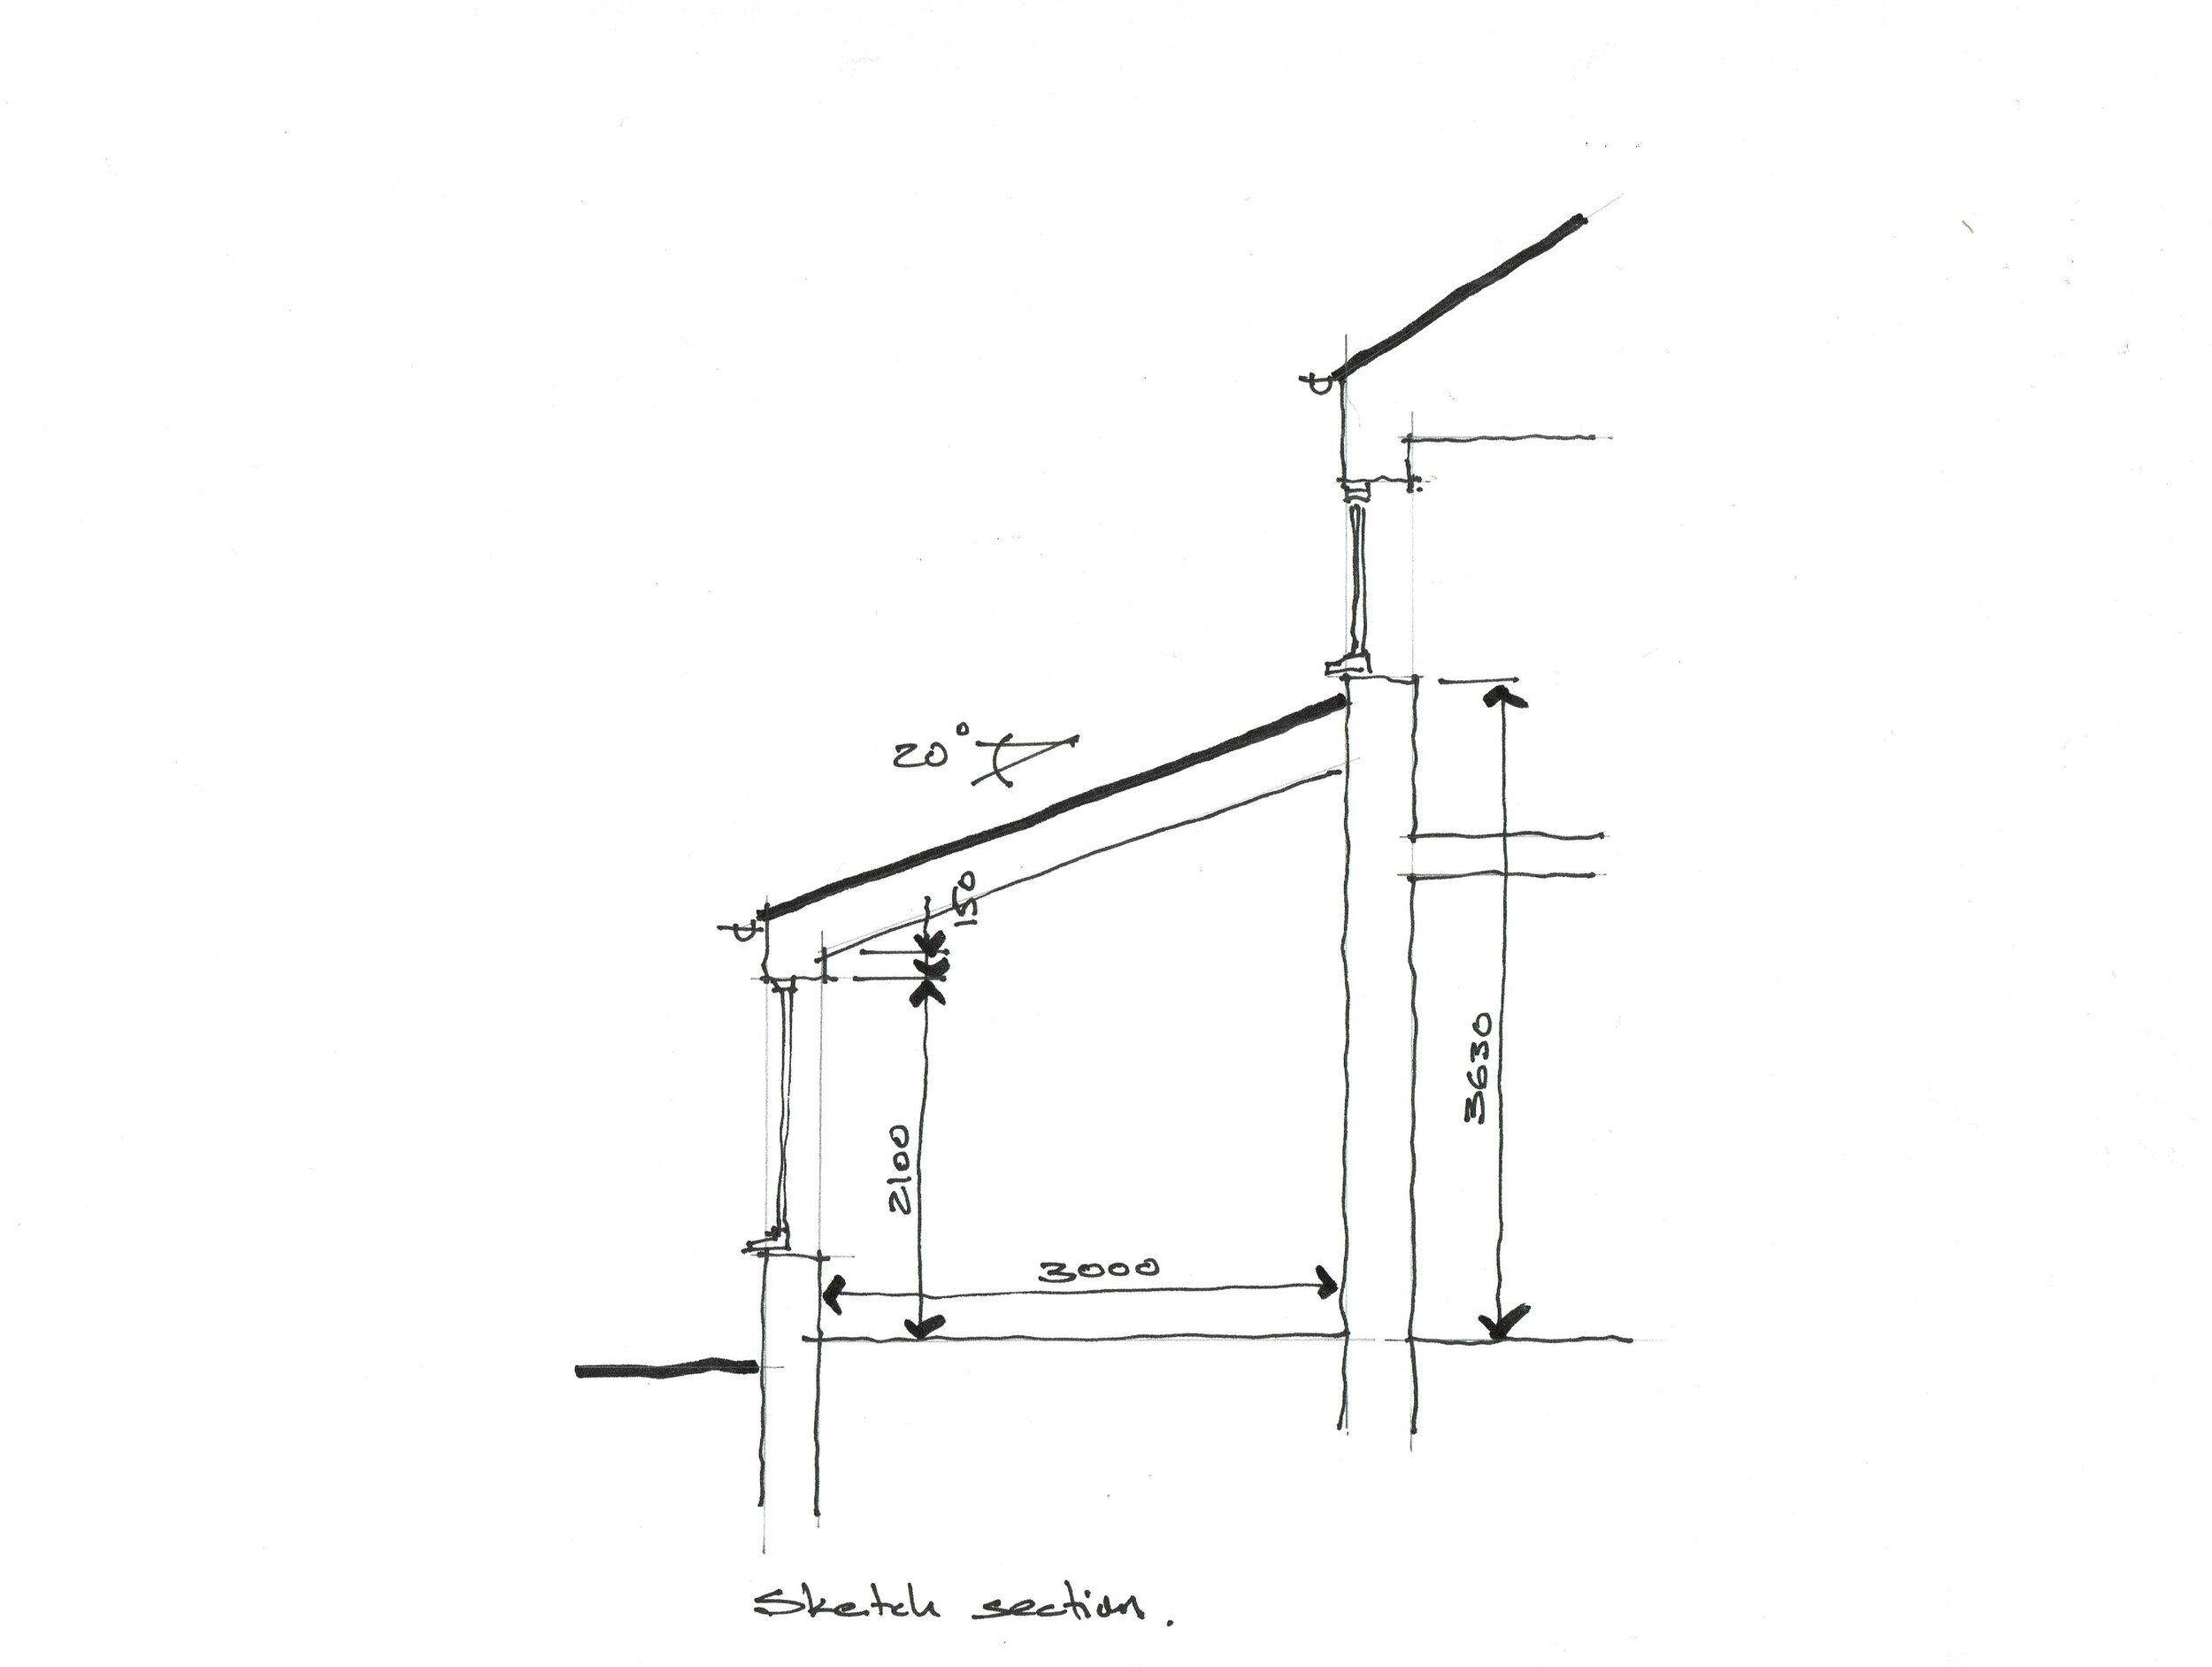
You quickly set up a cross-section through the extension and find that the roof pitch is approximately 20 degrees. Armed with the range of answers that you’ve received, what are you going to do next?
You respect everyone who responded to your query, and you’re conscious that they all have more experience than you. The fact that you didn’t receive a definitive answer is a bit of a mystery to you. As is the fact that nobody told you where to find the right answer.
Here’s a bit more detail about the scenario:
The director responsible has previously agreed on the plan layout of the scheme with the client, together with the principles of the external wall construction, glazing, the ceiling profile and the fact that the roof is to be finished in slate.
In a real office situation, it would be possible to discuss the issue of the roof pitch with the director and agree on a way forward. But let’s say that they’re out of the office for a while, and you have an opportunity to come to your own conclusions.
First, the roof pitch you’ve initially drawn will probably affect what you do. If it had been 25 degrees or above, it’s possible that you wouldn’t have given things any further thought (but you might want to think about that in the light of what follows).
At 20 degrees, the responses, although varied, make it sound like you could have a problem.
To progress things, you need more reliable information, and there are two areas that you need to focus on:
The rules:
You need to find the source of the relevant criteria in guidance or regulations to know exactly what you must achieve to comply.
Accuracy:
You need to have confidence that your drawing accurately represents the situation, that your estimate of the roof pitch is reliable, and that you can see how it compares with the rules.
Regulations and guidance
Here are some sources that might be worth investigating:
Building Regulations (Approved Documents).
NHBC Standards.
British Standards.
Websites of slate supply companies.
Phone calls to slate supply companies.
Roof construction books.
Internet search.
Building Regulations: Approved Document C (Site Preparation and Resistance to Contaminates and Moisture) gives some general guidance on the waterproofing of roofs, but there is nothing specific.
The Approved Documents would be reliable, but they don’t offer any help in this instance.
NHBC Standards: These are standards produced by the market-leading warranty provider for new-build housing. They often provide more information than the Approved Documents. Section 7.2.19: Table 12 states that the minimum pitch for double-lap slate roofing is 20 degrees (subject to headlap), but it gives no further explanation regarding the circumstances in which the minimum would apply.
NHBC Standards would be reliable, but in this instance, they don’t provide enough information.
British Standards: Most materials and conventional methods of construction in the UK are covered by British Standards. Regarding slate roofing, the relevant standard is BS5534:2014+A2:2018 Slating and Tiling for Pitched Roofs and Vertical Cladding.
British Standards are, in this instance, the reliable source of the required information. From reading the standard, you learn that the minimum pitch depends on the following:
The level of exposure at the site (a map of the UK is provided with exposure designations).
The height of the eaves (the exposure map only applies up to an eaves height of 12m).
The length of the roof slope (the standard has two categories: slopes of less than 6m and slopes of less than 9m).
The lap of the slates (an equation is given for deriving the lap length).
The size of the slates.
From BS5534, you establish that for your project, the exposure is moderate, the eaves is below 12m, the roof slope is less than 6m long and that for 500mm long slates and a lap of 113mm, a minimum pitch of 20 degrees is acceptable.
Note: British Standards are controlled by copyright; unfortunately, I can’t provide a link or extract for reference.
Slate supply companies: People working for companies that deal with a particular material or product or construction method can often be good sources of information. Regarding slate roofing, many slate suppliers provide online information regarding slate sizes and minimum pitches. Often, they will state that the information complies with the British Standard, further emphasising that this is the ultimate source of the information you need.
These sources can be reliable, but you must be careful that the online information is current or that the person you call knows what they’re talking about.
Roof construction books: There are many books to choose from, but they don’t always contain the information you want. For instance, ‘Roof Tiling and Slating: A Practical Guide’ by Kevin Taylor states the following:
‘The minimum pitch for any double-lap slating is only 20 degrees, but there are many design factors that go into this and so, in reality, this is rarely seen; a more realistic minimum pitch for most slates is around 27.5 degrees, but even this depends on certain conditions’.
Textbooks can be reliable, provided that they’re up to date, but will only rarely contain exactly what you need.
Internet search: Searching with the right search term can lead you to the right answer.
This source is only as reliable as the people or companies behind the sites that you visit. You must be careful that the online information is current and that you’re looking at information applicable to your country.
The actual design
Now that you’ve established that a minimum pitch of 20 degrees is possible in your case, you draw the cross-section through the roof more accurately. In order to do so, you re-confirm all of the critical dimensions:
The agreed internal width of the extension is 3m.
The agreed height to the top of window and door frames is 2.1m, and above this, an allowance of 150mm has also been made.
You check the dimensional survey for the existing property and note that the vertical dimension from the finished ground floor level to the underside of the sill to the first floor window was specifically measured (thankfully), which is 3.63m.
With a colleague, you establish that an appropriate allowance for the thickness of the overall roof construction is 325mm and that a minimum 75mm vertical zone should be allowed for the lead flashing beneath the window sill.
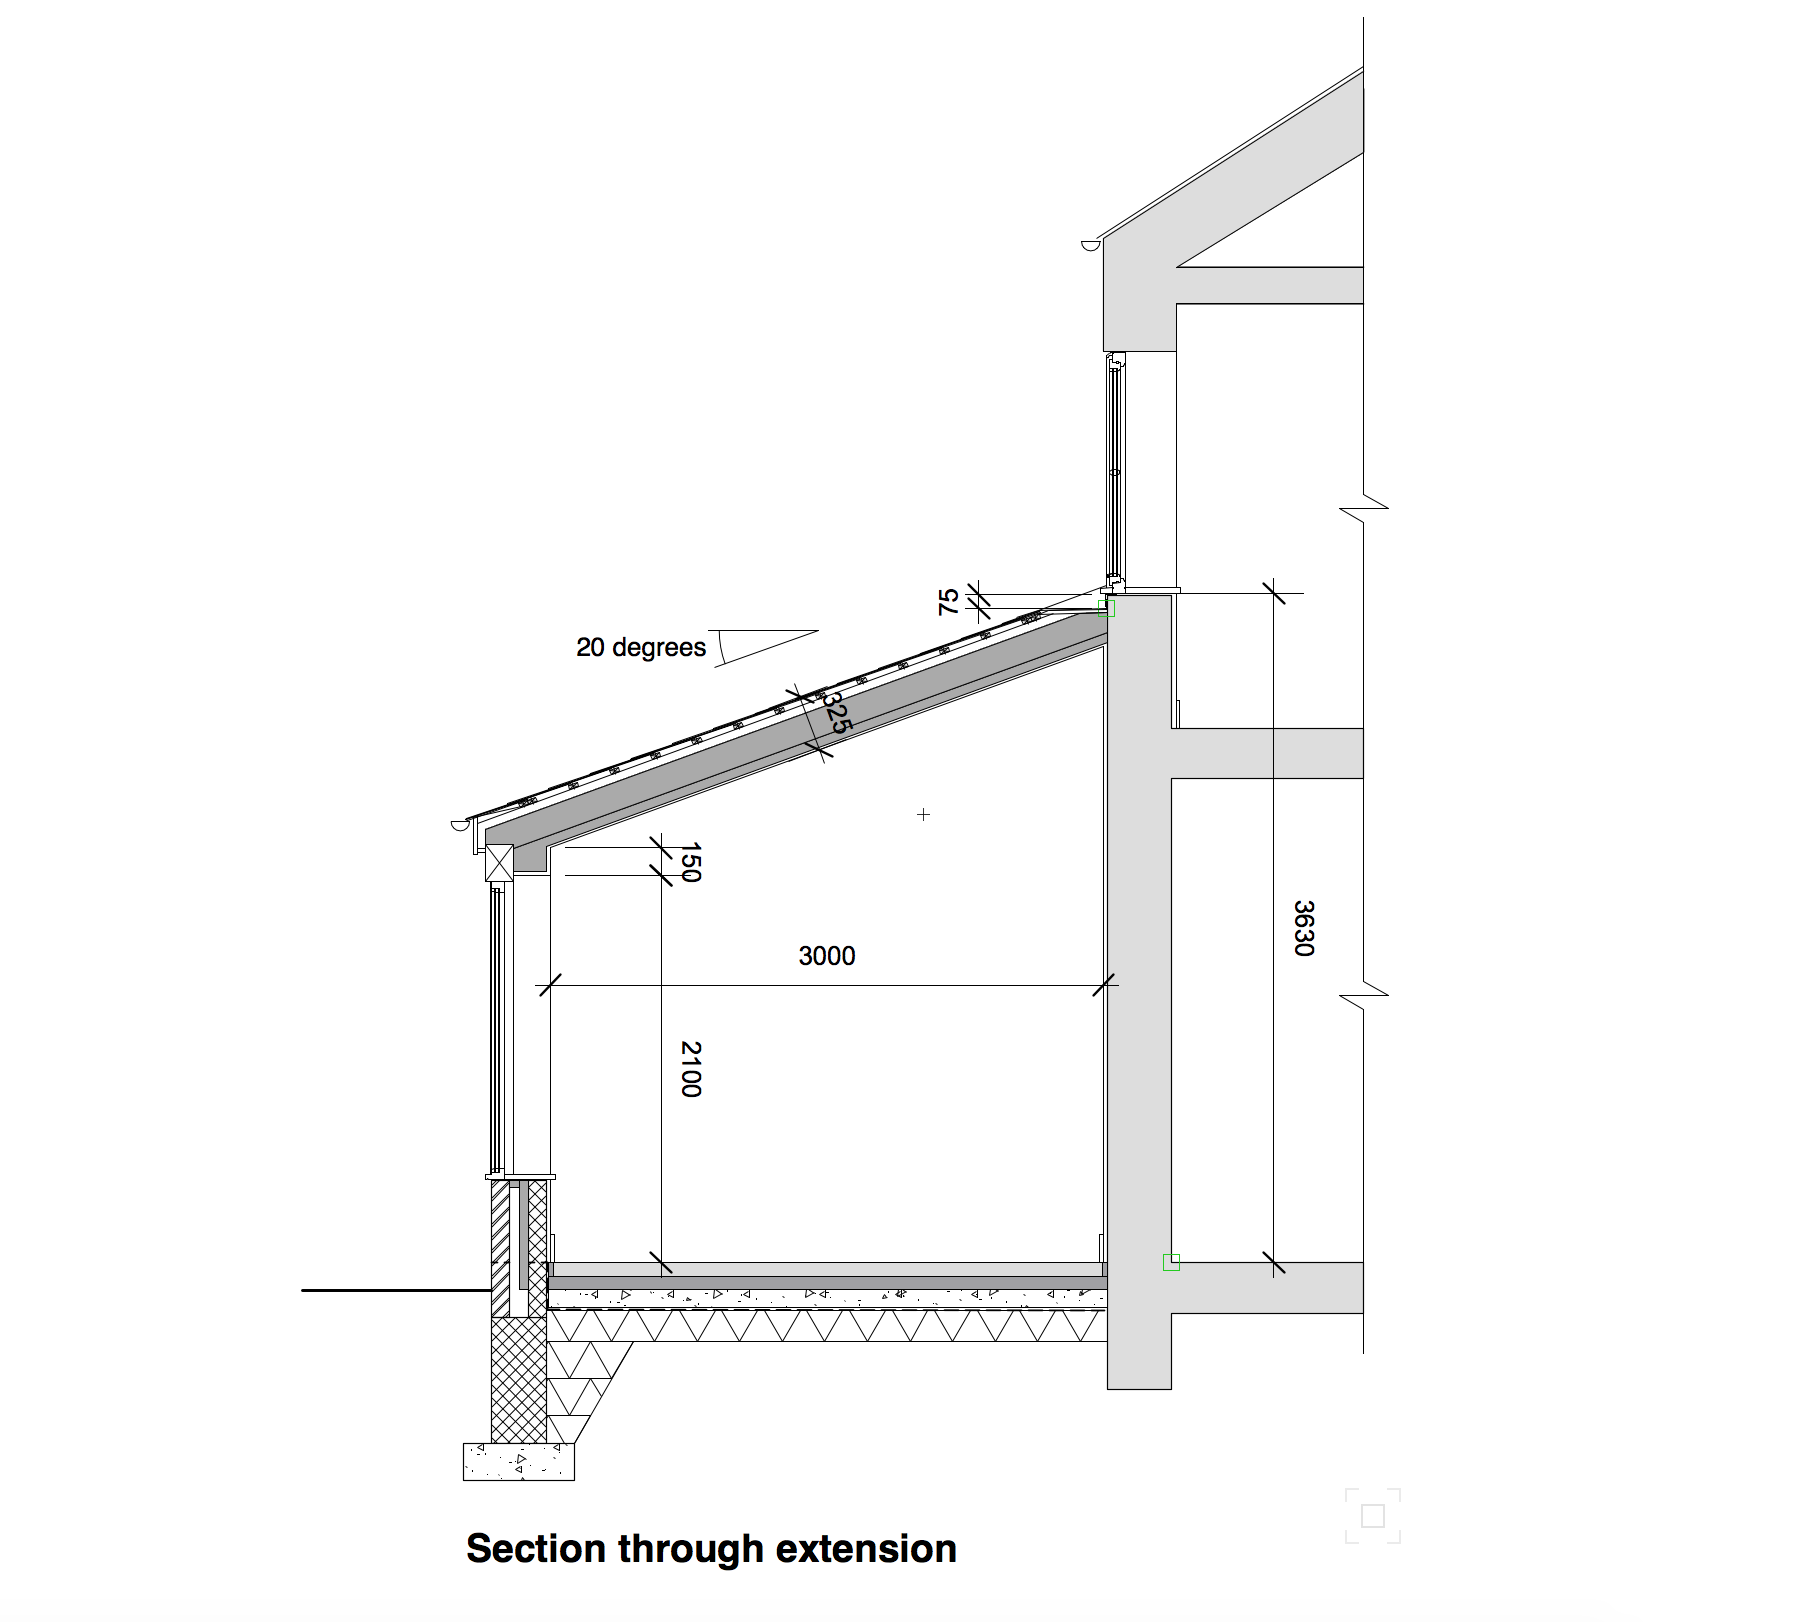
The resulting problem
From your more accurate drawing, you now establish that at 20 degrees, the roof would clash with the existing window sill. The roof pitch would need to be approximately 18 degrees in order to meet the wall beneath the sill. This is the issue that you discuss with your director on their return.
The result of your conversation is as follows:
It is agreed that the roof pitch should be a minimum of 20 degrees, preferably a bit more.
A couple of likely slate suppliers are consulted, and they confirm that they are happy to supply 600x300mm slates for a minimum roof pitch of 20 degrees, assuming a minimum lap of 125mm.
You consider some alternative solutions.
Alternative 1: Accept a roof pitch of 20 degrees or slightly above and accept some leadwork detailing around the first floor window sill to allow for the issue.
Alternative 2: Drop the height of the window/door frames and/or reduce the 150mm wall height above so that the roof height can be reduced (it needs to be reduced by 130mm).
Alternative 3: Replace the slate finish with a roofing material that works for lower pitches, zinc sheet being the most likely candidate.
Alternative 4: Re-work the design with parapet walls and a concealed flat roof.
Alternative 5: Reduce the width of the extension (it would need to be reduced by 360mm).
Alternative 6: Accept the 18 degree pitch and waterproof underneath. This would add 50-100mm to the roof construction thickness; hence, the height of the ceiling would have to be reduced. It would also be more costly and complicated.
It is agreed that Alternative 1 is the ‘least worst’ option, and that is what you draw. The flashing is best positioned in line with the window sill since it can’t be below it, and the resulting roof pitch is 20.75 degrees, i.e. a little above the minimum.
Your drawing is used to discuss the roof pitch issue with the client, and the other alternatives are also discussed. The client doesn’t like the other alternatives and accepts the recommended solution as you’ve drawn it.
The chosen solution isn’t quite what you wanted because you recognise that a cleaner solution would result from the flashing detail running consistently below the window sill. But, in this case, the visual/technical compromise is small and allows the roof to be designed within the recognised guidance.
You can now complete the drawings package and submit the planning application.
Conclusions
On the face of it, this case study is about the minimum pitch of a slate roof, but the real purpose of the post is to highlight the interaction between your knowledge, the design and the potential consequences. There are three aspects worth highlighting:
1. Knowledge and the beginner
I skipped over a vital aspect right at the start of this case study. I assumed you knew there was such a thing as a minimum pitch for a slate roof.
If you were a beginner, you wouldn’t have known this constraint existed. Perhaps the only way you would come to know about it is via a more experienced colleague telling you, usually the project architect or responsible director or a mentor, if you have one.
The true beginner is excused from not knowing as they rely on the input of others with more experience and responsibility. This means the onus is on those others to ensure you know about these things.
Once you become aware of the issue, the onus is to ensure that your design complies with the constraint. Although you’re unlikely to work in isolation, you now share a responsibility to ensure the design complies.
In the case of minimum pitches, this is something that exists for all forms of roof construction.
2. Confidence in your design concept
In a different version of this case study, you might have only checked the roof pitch after planning permission was granted. In finding that the slate solution didn’t work, the client preferred a zinc sheet alternative solution, and the design had to be reworked, and an amendment to the planning permission was sought.
This kind of situation is to be avoided. In order to do so, it requires you to constantly search for aspects of your emerging design that may be critical while the concept is being developed. It’s a skill that you can work on as your experience increases. You wouldn’t expect to be designing everything in detail at the concept stage. Yet, to have confidence in your concept, you must have tested the principle of everything that might be critical.
A concept later found to be unworkable isn’t much of a concept.
The example I used tested the design concept for technical compliance, but I could have chosen other types of issues where compliance is necessary, such as designing for planning policy or building regulations or manufacturer’s product requirements or other legislation.
3. Getting to the source of things
Early-career architects tend to be reluctant to search for information sources themselves. This is understandable because, at the beginning, there are just too many unknowns. You don’t know what you’re looking for, where to find it or what to do with it. So it’s easiest and best to ask.
But because it’s easy to ask, there’s a temptation to continue asking, and you risk becoming lazy. Or you don’t develop the confidence to seize the initiative. Or you stop thinking for yourself because you can usually find someone to think for you. This will act as a brake on your own development.
It will always be preferable to look for the source of the information you need yourself.
There are four reasons to do this:
Most other people haven’t done it. What they know could be second-hand or confused, or maybe they knew it once but have forgotten. How can you ensure your solution is workable if you’re not working to the right criteria?
Things change. Legislation, standards and best practices are revised and improved periodically. You need to be working with the latest guidance.
Knowing the sources of your information builds confidence. It allows you to design and discuss things with authority.
You will find other things you didn’t know about when you search. These things might not be relevant right now, but when they are, you’ll know where to find them. You’re beginning to find your way around.
Summary
As you work on developing a design, here’s a checklist to focus on:
- Think hard about what might be critical about your design.
- For anything that is critical, find the source of any guidance or rules that apply, so that you're working with reliable information.
- Check all relevant aspects of your design, with a view to avoiding assumptions.
- Where assumptions are unavoidable, make sure that they are reasonable and treat them with caution.
- Compare your design with the guidance or rules.
- Where you are close to a threshold (such as a minimum pitch) or have crossed it, discuss it with a responsible colleague and agree a way forward.
- Recognise that your developing knowledge of a project puts you in an increasingly responsible position.
The third and final part of this series will include several recent examples where I’ve found myself searching for sources of information and what I learnt in the process.